In principle, it is still relatively easy for a professional attacker to send a fake e-mail. In a targeted attack, 2 - 3 victims who fall for the phishing email are enough for him. With a reasonably prepared email, he will fly far below the radar of typical protection mechanisms. However, to raise awareness, we want to reach as many people as possible with phishing simulations. That is why we send hundreds of these fake emails in a short period of time. And that is exactly the challenge.
Whitelisting for phishing tests and phishing simulations
This is how your phishing test emails get through

Challenges when sending phishing emails
Mass makes the difference
Almost all e-mail security solutions have certain threshold values for blocking a sender. Typical e-mail servers, for example, refuse to accept e-mails from the same sender after about 50 e-mails within a short period of time. However, some anti-spam systems may kick in after just 10 emails and put the IP address or domain of the e-mail server on a blocklist.
However, we would like to reach as many users as possible to raise awareness as part of a security awareness campaign. And that in a reasonable amount of time. If the mailing were to be stretched out too much, users would warn each other, and the result would be greatly watered down.
So, the challenge is not to send one fake email, but 100 or 1,000 in a minute. And this mass cannot really be tested properly in advance.
Really? We have something like that?
We have already encountered many customer situations where different e-mail domains (e.g., e-mail addresses in different countries or at subsidiaries) are received via different e-mail systems with completely different protection measures
In addition, many Internet and cloud providers now offer technical protection measures that some customers (and even some providers 😁) are not aware of. The headline "Really? We have something like that?" is the original statement of a system engineer on our notice that we ended up on a blocklist due to their cloud security solution despite whitelisting
So the challenge, especially for larger companies (> 2.000 employees), is
- to check all relevant routes as far as possible,
- to whitelist the phishing sender email address in the preceding email security solutions,
- to add the IP address and sender domain of the phishing server to the list of secure senders on the e-mail systems,
- to whitelist the phishing website in all proxies, cloud systems and bowsers used, and
- inform all relevant employees in security operation centers or help desks if possible.
After a few tries you will always find the right settings, but be aware that in the first simulations, despite careful preparation by you and us, not all emails will be delivered.
Whitelisting to get the email delivered
Whitelisting always creates a potential security risk. An attacker could send real phishing emails from the IP-address and thus bypass a check. However, the risk is limited if the IP address is really assigned to the phishing server. An attacker would first have to find out about this IP address and then compromise the server. However, you should still regularly check which whitelisting settings are still required after a simulation and remove any settings that are no longer needed on all systems.
Whitelisting of preceding security systems
If you operate your e-mail infrastructure yourself, it is usually behind security systems such as SPAM filters or firewalls (Sophos, Ironport, etc.). These systems often do not react to the individual test mails, but they do when hundreds of mails are sent during the actual attack simulation.
Talk to the respective system administrator about the scenario and let him make the right settings. Often, the sender address and IP address must be whitelisted so that the massive number of emails are not blocked.
Whitelisting in Exchange Online: the "normal way"
Exchange Online / Microsoft Azure is under constant development by Microsoft. Features may move to other portals, disappear or new features may be added. This guide reflects the status as of September 2021.
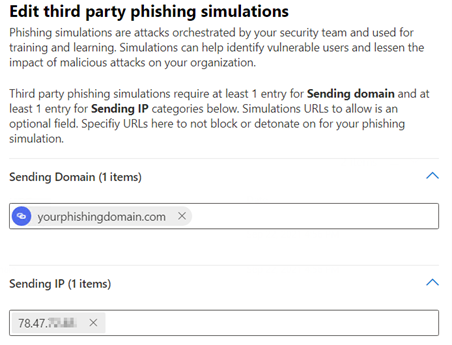
Whitelisting of IP-Adress and Domain via "Advanced Delivery Role"
1. Open Microsoft Security Center.
2. In the Security Center go to Policies & Rules, to Threat Policies and there, under Rules to the Advanced Delivery rule. There, click on the Phishing Simulation tab.
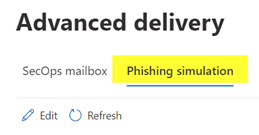
3. Use Add to enter the sending domain of the e-mail under Sending Domain, and the IP address of your phishing server that is sending the e-mail under Sending IP.
So, if you want to send a phishing simulation from the sender alert@microsoft-security.com, the domain to be entered is microsoft-security.com.
According to Microsoft documentation, these settings virtually disable all security checks unless the email contains real malware.
- Filters in Exchange Online Protection (EOP) and Microsoft Defender for Office 365 don't take actions.
- Zero-hour Auto Purge for SPAM and Phishing (ZAP, emails detected as malicious can be automatically removed from users' mailboxes) doesn't take actions.
- Automated investigation and response (AIR) in Microsoft Defender doesn't take actions.
- Safe Links in Defender for Office 365 does not block the identified URLs and attachments.
- System Alerts are not triggered.
- If the email is reported via the Microsoft Report Phishing button, admins receive a message in the Azure Security Portal under Submissions that the message is part of a phishing simulation and not a real threat.
For more information about security settings in Exchange Online, see https://docs.microsoft.com/en-us/microsoft-365/security/office-365-security/configure-advanced-delivery?view=o365-worldwide
Whitelisting in Exchange Online: the workaround
Please try the "normal way" above first. In 85% of all tentants this works. In some tenants, however, the "normal way" is not sufficient. Why this is the case, probably not even Bill Gates knows. 🤷♀️
Our guess is that old security settings are overriding the new "all-in-one" whitelisting of the "normal way". However, if your emails still end up in quarantine despite whitelisting via the "normal path", it's time for the crowbar.
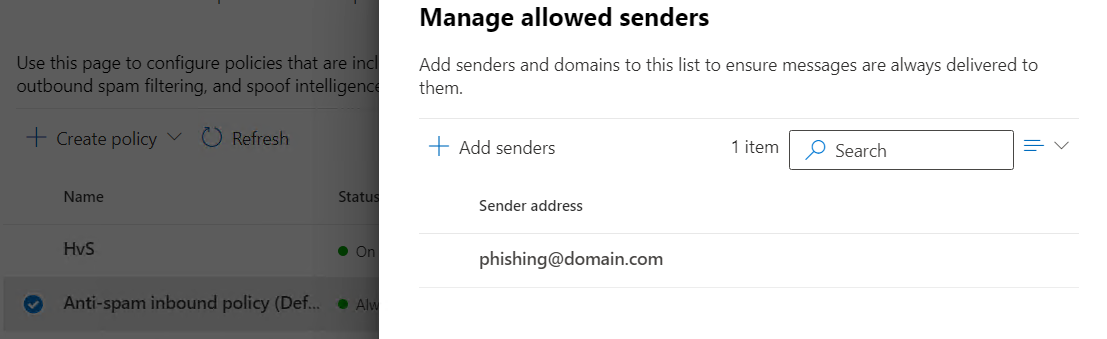
Whitelisting of IP address in "Anti-spam policy"
1. Open Microsoft Security Center.
2. Go in the Security Center to Policies & Rules, to Threat Policies and there under policies to Anti-spam policy. There you add the IP address of your phishing server in the Connection filter policy.
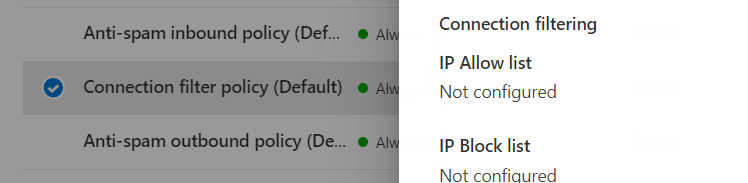
3. Stay with the anti-spam policies and switch to the anti-spam inbound policy. There add the sender address of the phishing simulation.
Creating a Mail Flow Rule in the Exchange Online Admin Center
Attention: the Exchange Online Admin Center probably needs different credentials than the Microsoft Security Center.
1. Open Exchange Online Admin Center and go to Transport rules.
2. Under Mail flow click on rules and use the plus icon to add a new rule based on the Bypass spam filtering template.

3. Under add condition, enter the IP address of your phishing server. The rest of the rule already fits through the template.

With these settings, you have now activated the "ultimate switch off". Please remember to reverse the settings after the phishing simulation.
Tracking of opened emails
Phishing simulation software often offers to output a value for "e-mail opened". For this purpose, a "tracking image" is implemented in the e-mail. The image is reloaded from the server when the e-mail is opened, which makes it possible to determine the value for "e-mail opened". The evaluation thus becomes more realistic, because the pure number of sent e-mails also includes all employees who are, for example, on vacation, sick, in partial retirement, on maternity leave, etc. and therefore cannot open the e-mail.
So far, so good. However, Outlook blocks the download of pictures from "untrusted" senders. This means that an "e-mail open" is only counted if a user consciously clicks on "Download picture" in addition to opening the e-mail.
![]()
The only workaround to automatically load the tracking images is to add the sender addresses to the users' "SafeSenderList". Then the images will be loaded automatically as soon as the email is opened. Only with this setting the value "Email opened" provides a realistic picture.
However, this is not a central setting, but must be done for each recipient individually in their mailbox. You can use Powershell scripts for this in Exchange (On Premise and Cloud):
Add to SafeSenderList
Set-MailboxJunkEmailConfiguration -Identity "user1@company.com" -TrustedSendersAndDomains @{Add="phishingdomain.com"}
Remove from SafeSenderList
Set-MailboxJunkEmailConfiguration -Identity " user1@company.com " -TrustedSendersAndDomains @{Remove=" phishingdomain.com "}
Unfortunately, this only works per mailbox, so you need a loop with all mail addresses.
You can find more information at
https://docs.microsoft.com/en-us/powershell/module/exchange/set-mailboxjunkemailconfiguration
Since click rates for phishing simulations are always influenced by many different factors ( degree of difficulty of the simulation, number of addressees, warnings in open-plan offices, warnings by emails within a team, blocking by an eager administrator, etc.), the effort for tracking "email opened" is already rather something for enthusiasts. We usually recommend saving the effort and not taking click rates too seriously in general. 😉
Whitelisting to ensure the phishing site is reachable
The delivery of the email is one thing. Calling up the phishing page is another. If you work with "standard scenarios" of the typical phishing tool providers, this is usually semi-unproblematic, because they often use fixed (but unrealistic) URLs and thus won't call Google Safe Browsing and colleagues to the scene. Unfortunately, successful attackers usually do not use standard scenarios (we know this from our incident response work and our social engineering assessments). After all, they only need to get 2 - 3 e-mails through (see the section above on "Mass makes the difference"). We therefore like to phish with business scenarios that are as realistic as possible. And such landing pages do (thank goodness) attract the attention of security tools once a certain click-through rate is reached.
Whitelisting at central Internet gateways
Internet access is protected by security systems such as proxy or web application firewalls. Usually, these systems do not interfere with a phishing simulation. However, there are customer situations where the phishing website must be explicitly whitelisted, as the systems automatically compare addresses with phishing lists such as Google Safe Browse.
Talk to the respective system administrator about the scenario and let him make the right settings.
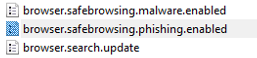
Google Safe Browsing
Without whitelisting on Google Safe Browsing, phishing simulations that simulate "real" login pages with realistic URLs (e.g. Microsoft 365 or PayPal) are blocked by Google within minutes.
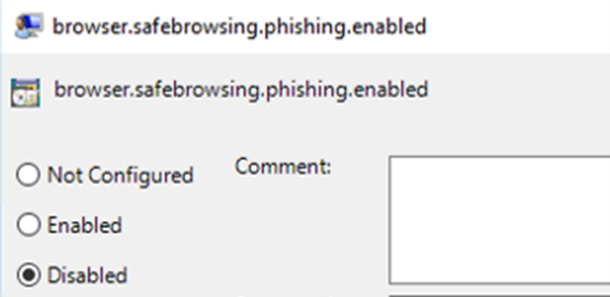
Google Chrome and Firefox use a central Google Security feature, the "Safe Browse" list. In principle, Google Safe Browsing works similarly to Microsoft Safe Link: Potentially dangerous links are automatically checked for phishing.
Since in Chrome and Firefox every click on a link is checked centrally at Google Safe Browsing and in phishing simulations many users call the same link in a short time, phishing simulations end up on the Google Safe Browsing blocklist very quickly (within 1 - 2 hours, record is 12 minutes). Upon clicking the phishing link, users with Chrome or Firefox browsers will then see a very prominent warning.
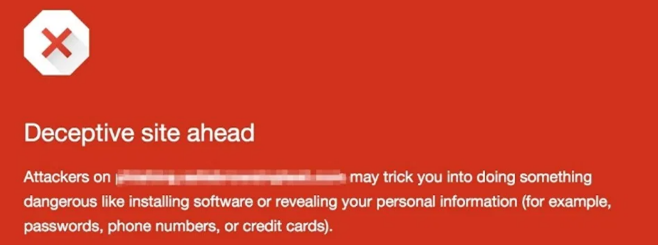
If you use these browsers as default browsers in your company, the phishing simulation is dead from now on.
DThe owner of the domain (in our case, we, HvS) has the possibility to remove the domain from the block list via a Google online tool, but this usually takes 3 - 24 hours and is therefore virtually useless, because in this time the phishing attack has already spread among the staff. In addition, the page can very quickly end up on the block list again after it has been reactivated, as Google Safe Browsing works with automated rules. Google does not offer the possibility to whitelist a website centrally worldwide, and that is a good thing.
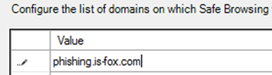
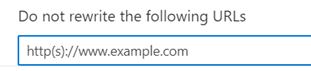
However, you can define so-called SafeBrowsingAllowlistDomains in your Chrome client browsers via group policies. Domains in this list are not checked by Google Safe Browsing, so the above warning window does not appear even if the domain is already on the block list.
If you increasingly use Chrome as a browser in your company and want to simulate realistic business scenarios, client-side whitelisting via SafeBrowsingAllowlistDomains is mandatory in our view, otherwise the phishing simulation will end very quickly.
You can find more information at https://chromeenterprise.google/policies/#SafeBrowsingAllowlistDomains
Google Safe Browsing: Whitelisting via group policies for Google Chrome
1. Download the corresponding policy template:
https://www.chromium.org/administrators/policy-templates
2. Store the GPO templates on the Windows Domain Controller and assign the policy to the appropriate user groups.
3. Configure the policy.

4. Add the domain of the phishing page.
5. Activate the policy.

Please remember to remove the domain from the policy after the simulation.
Google Safe Browsing: Whitelisting via group policies for Firefox
Firefox can only activate/deactivate Google Safe Browsing globally, not for specific domains. Disabling Google Safe Browsing thus significantly increases the risk of real attacks and is therefore not recommended.
If you still want to take the risk:
1. Download the corresponding policy template:
https://support.mozilla.org/en-US/kb/customizing-firefox-using-group-policy-windows
2. Store the GPO templates on the Windows Domain Controller and assign the policy to the appropriate user groups.
3. Deactivate the policy.
After the simulation, be sure to reactivate the policy, as deactivation means significantly reduced protection against phishing.
Microsoft Defender SmartScreen: Whitelisting via group policies for Microsoft Edge
Microsoft Defender SmartScreen is the equivalent of Google Safe Browsing for Microsoft Edge. If you whitelist the domain and IP address according to "Whitelisting in Exchange Online", Microsoft Defender SmartScreen should ignore the page call, according to Microsoft. No further settings in Defender SmartScreen should then be required. The following instructions are only for the case that the "should" does not work.
Whitelisting via group policies for Microsoft Edge
1. Download the corresponding policy template:
https://docs.microsoft.com/en-us/deployedge/configure-microsoft-edge
2. Store the GPO templates on the Windows Domain Controller and assign the policy to the appropriate user groups.
3. Configure the policy.

4. Add the domain of the phishing page.
5. Activate the policy.
Please remember to remove the domain from the policy after the simulation.
Whitelisting Microsoft Safe Links
If you whitelist the domain and IP address according to "Whitelisting in Exchange Online", Safe Links should automatically ignore links and attachments in this email according to Microsoft documentation. No further settings in Safe Links should then actually be required. Actually, some Azure tenants still don't care. Therefore, here is the process for safety's sake.
Microsoft 365 Defender offers (depending on your license status with Microsoft) scanning of potentially dangerous links in emails. If you use this feature, it is quite possible (especially in phishing scenarios that simulate a Microsoft login page) that the phishing page will end up on the Safe Link Blocklist.
1. Open Microsoft Security Portal and go to Threat Policies and to Safe Links settings.
2. In the policy that checks emails for "unknown potentially malicious URLs" you can define exceptions. Add the domain of the phishing server there.
Please remember to remove the exception after the simulation.